# 🚀How to Install Google Ads Tracking on Shopify?🚀

1. First of all, **activate** our application’s extension by clicking on the activate button.

<figure><img src="https://lh7-rt.googleusercontent.com/docsz/AD_4nXfPFAA8WBS_zHF4bsnW2n-lwCQNyh4lDwOulp67JEMr-mRGlIjN929ZxybhEa7SS6ROk4Aa6L4Rd3WifG4ep3ADxEcUNJhcuhW967Kb1qm8PyKEgQuFzIiN8j5LKNmmIgz9BFbDYwVq7hIYemEIKGfaCY--?key=ZjRnmer1HVEsSLnsCLcGMA" alt=""><figcaption></figcaption></figure>

2. Now click on **Add Google Pixel.**

<figure><img src="https://lh7-rt.googleusercontent.com/docsz/AD_4nXeiQrWw6Ny1RQkTuc1r_UKFYF4IizYaQ9T9uUUalo8sjaNHtXB_Uaru584HhacsmuZWTS4iin6hmthD4OhgENL2jDEWYXYaHbjAgCN26W3U9n0xr_RC0h0tzl6ZXbmwaTF84oxLSYaoxaBphfg0qnDkD1dr?key=ZjRnmer1HVEsSLnsCLcGMA" alt=""><figcaption></figcaption></figure>

3. Click on "**Sign in with Google**" and connect the Google account that you use for both your **Google Ads** and **GTM** accounts.

<figure><img src="https://lh7-rt.googleusercontent.com/docsz/AD_4nXdTuw7BF_HOa3UNFtijhQx5CZewoNiTNH3Nc-lsiXXV3q4fv44BxsLEAbP254Sy4rVvHREyf1xFXOAAyRjkUmxQzm4MT8jBd0PAJHZkBQJG36sqD0gAk6zuskT7Ix0HV4OP2say51PWAfUAeqKfGuUJV8iM?key=ZjRnmer1HVEsSLnsCLcGMA" alt=""><figcaption></figcaption></figure>

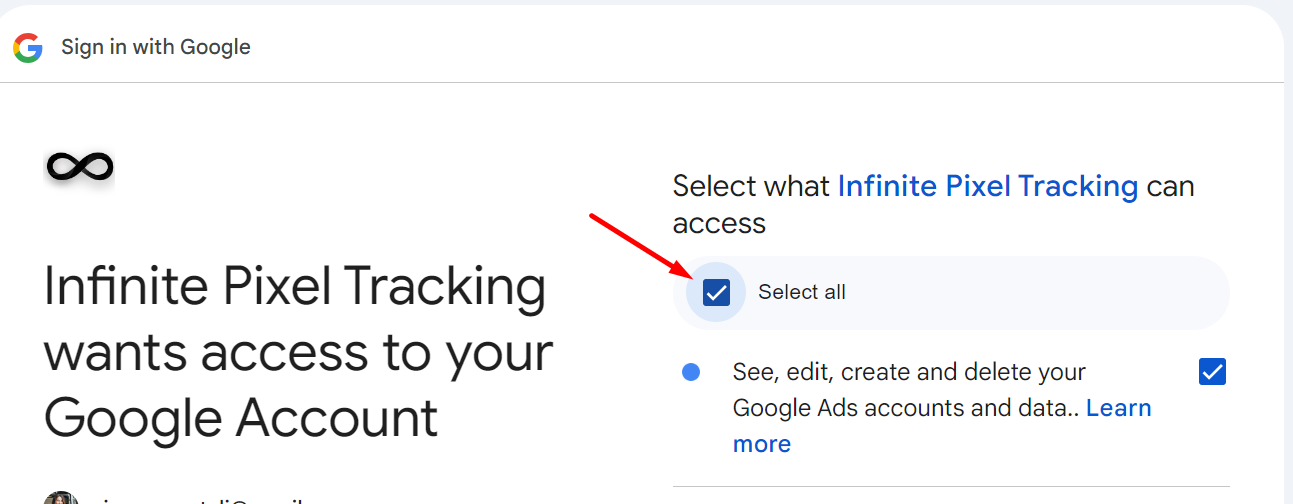
4. Make sure to **select all** scopes when signing in.

<figure><img src="/files/j3maAfO5D3QvuYVObrs1" alt=""><figcaption></figcaption></figure>

5. Next, choose your **Google Ads** account and **Google Tag Manager** account as displayed below. After that, select your **GTM container**—you can either create a new one or choose from the existing containers..

<figure><img src="https://lh7-rt.googleusercontent.com/docsz/AD_4nXdEAK2tamrTu3Hf-dea7sdC2Q7mx6_9ImVuQP4co_pmy-D87OgVl_AjyPvShug8bj8PPFp3oZ-1avwjCjIYzfHSt_tJ4_ZnVUhEdfJNunNVggfyXMyGWrfdWU6KfAxtBHN5ilLvWJnGUi6IJktGmurd8rXs?key=ZjRnmer1HVEsSLnsCLcGMA" alt=""><figcaption></figcaption></figure>

6. Now, choose your **pixels**—you can either create new pixels for all events or select existing ones if you already have data in those pixels. Once selected, click on "**Continue**."

<figure><img src="https://lh7-rt.googleusercontent.com/docsz/AD_4nXfaaQlIAJqmbm47ouAFmpRqCZKYFbd7JrjulizhVbj0NPLoOS2RJQVt6Mms38tw-j_n8ea6O06FVF93aPnXXrBtOdQrzEr2VLW4lijzSl3Y5PGnhsIe7-MfjmXsRFNSqLoDZjpXlcq0L_QbuESDZ2bUhn7o?key=ZjRnmer1HVEsSLnsCLcGMA" alt=""><figcaption></figcaption></figure>

7. After clicking "**Continue**," you'll see this section. First, click the "**Copy**" button, then select the "**Create Custom Events**" button next to it.

<figure><img src="https://lh7-rt.googleusercontent.com/docsz/AD_4nXeTrJJUKmn60dUt87TAIHzUo6nn3O-wZyUqtHoIlwjsgOEuPvJ1vfBrq265jRrdoCPyIdmon5RqQ25MEz-w4FG5uMkCAR12jr3zY6FdHX0lqcGlsqSCD1zx2-dBtegEyNzDewd1VxLMMWObvBiMmVWvzkfQ?key=ZjRnmer1HVEsSLnsCLcGMA" alt=""><figcaption></figcaption></figure>

8. After clicking the "**Create Custom Events**" button, you'll be redirected to this page. Here, you need to click on "**Add Custom Pixel**."

<figure><img src="https://lh7-rt.googleusercontent.com/docsz/AD_4nXe_61TOo6_wZOSsVOsJHonBaHeb0Vc5P8uEDwQnUx48aKC9YwglEziqMjYTQlHvOjtzJPbOmixx67l--Fy7cvIaRwwWHwi3ciydfWtttlKrlXS1PO0WuTd86ZII1yN1uo8ct1wnVhb7erlgDB9GJToD61rw?key=ZjRnmer1HVEsSLnsCLcGMA" alt=""><figcaption></figcaption></figure>

9. Once you click on "**Add Custom Pixel**," a pop-up will appear. Enter any name for the pixel, then click on "**Add Pixel**" to proceed.

<figure><img src="https://lh7-rt.googleusercontent.com/docsz/AD_4nXeFKQuiZ96A7Zf1pWe4Rv1_elaG3TXQKqmJUxyA4c_SW3fzq384dDyb5E7QwPcOZfFXJT6aNrGw34MFHdkmLapamAXz64XzUDnSycsRdLc52aUoXX4A39gT0yN_wx0kKraPvRRXaHzgO6Zok7Xju5aZE1s?key=ZjRnmer1HVEsSLnsCLcGMA" alt=""><figcaption></figcaption></figure>

10. Next, navigate to the "**Permission**" section and choose the appropriate option based on your needs. If you select "**Required**," the pixel will only collect data when users grant permission. In this case, I'll choose "**Not Required**," which allows the pixel to collect data without user permission.

<figure><img src="https://lh7-rt.googleusercontent.com/docsz/AD_4nXdBsbrCJtlhjiwFNFIkU-qdCR4OmvOgqAk8rFjwWOuV55LgnIlWk2bqU6cSZgt4fUJ_5O90n6qlX5tRLCdpjP3GhokGY3TGjkxa-BNWCxueDmHUM19pIxnxyxFlMLcrAFoE1-lDYmHYf7dPNq1vV10V-3SS?key=ZjRnmer1HVEsSLnsCLcGMA" alt=""><figcaption></figcaption></figure>

11. Scroll down and replace the existing code with the code you copied from the application. After pasting the new code, click the "**Save**" button at the top to apply the changes.

<figure><img src="https://lh7-rt.googleusercontent.com/docsz/AD_4nXfIWV9yuWOc7g1G0_a9gfewcpMy59sJu9YydVpocmDSoUeQ3mRwRjoaiYmmIBCP36VBhH6PGnR2DSXUbJngMmfq9AZAmheGZ2Vyxb-jJdvUKkpuEuanlt78ZqKMlwuOeip1fFLOPWlAmF4gmpZ2qPfqUswb?key=ZjRnmer1HVEsSLnsCLcGMA" alt=""><figcaption></figcaption></figure>

12. Now click on the “**Connect**” button to link the custom pixel.

<figure><img src="https://lh7-rt.googleusercontent.com/docsz/AD_4nXf9qOVuvtiw1gbs6uJfSDcGudufnTA10RkVoe_Q7d7uuhEC4ZGVHdEB8QPuKycBOjqMmKpSqIzj_XhsSQFj7dMm2tnmDKBOI5XU1DGtUNYloUS75GoH0mlBEPCou9UDtd1_kN8xsxeYxN9KxBNZH-Vwkd4?key=ZjRnmer1HVEsSLnsCLcGMA" alt=""><figcaption></figcaption></figure>

13. Now, return to the application and check the box labeled "**I've done this above**" located below the script. Then, click on "**Save**" to finalize the pixel setup.

<figure><img src="https://lh7-rt.googleusercontent.com/docsz/AD_4nXeBi163fae7D_ZRz5whS5-lZxSw7f8wcp3ZS76ShdP9VOtUjba5_Nkw_bznUctpJ17DsYy8MxqMMQCRNkj30d8xbyv5ovvlTd7a5MKGMbAptcVhRdqVDIvaX81Dub6v4SLoEKitakgclUPDz00F6f4nNyo9?key=ZjRnmer1HVEsSLnsCLcGMA" alt=""><figcaption></figcaption></figure>

<br>

{% embed url="<https://www.youtube.com/watch?index=7&list=PLG5hOPbOeKlJmmEPrlJ6wlrViFbhbsBGX&v=utkcH_xFhng>" %}

Similarly you can create **multiple** google pixels.😍

\
**Congratulations**🤩! Your pixel has been successfully integrated and is ready to track with precision!🥳<br>


---

# Agent Instructions: Querying This Documentation

If you need additional information that is not directly available in this page, you can query the documentation dynamically by asking a question.

Perform an HTTP GET request on the current page URL with the `ask` query parameter:

```
GET https://infinite-pixel-tracking.gitbook.io/infinite-google-ads-tracking-and-gtm/google-pixel/how-to-install-google-ads-tracking-on-shopify.md?ask=<question>
```

The question should be specific, self-contained, and written in natural language.
The response will contain a direct answer to the question and relevant excerpts and sources from the documentation.

Use this mechanism when the answer is not explicitly present in the current page, you need clarification or additional context, or you want to retrieve related documentation sections.